Basic Git and GitHub on IOOPM
Table of Contents
This document is in no way attempting to replace any of the excellent git guides out there (like this one). The purpose of this document is to serve as a starting point for how to interact with git – if you get stuck, get an error, or want to get fancy – you probably need to start looking elsewhere.
If you do not remember what version control is, or git, please start by reading this and then this. If you want some basic help in installing git, look here.
1 How to Get a GitHub Account for the Course
Du kommer att använda GitHub för att dela och versionshantera all kod som skrivs för kursen. För att undvika situationer som formellt räknas som fusk kommer alla att få ett privat repo att använda i kursen. Följ de här stegen:
1.1 1. Skaffa ett GitHub-konto
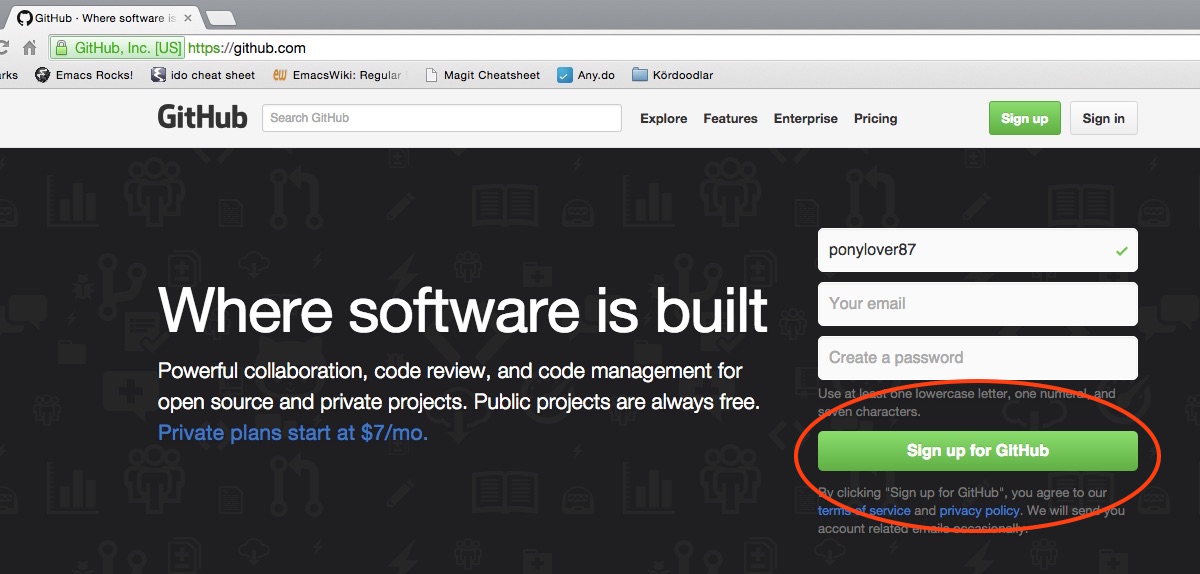
Först behöver du ett konto på GitHub. Om du redan har ett kan du hoppa över det här steget. På GitHubs förstasida kan du skapa ett konto genom att fylla i ett (unikt) användarnamn, din epostadress och ett lösenord, och trycka “Sign up for GitHub”:
På nästa sida behöver du inte göra någonting. Klicka bara på “Finish sign up”:

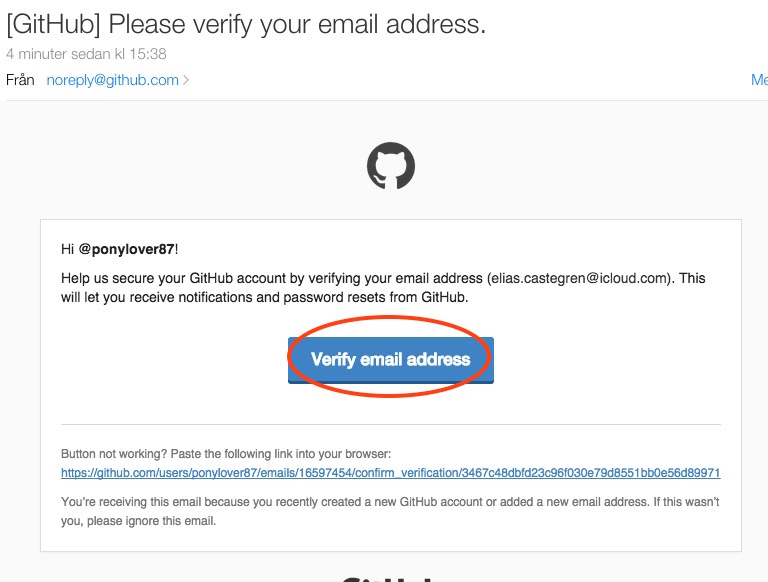
Efter ett litet tag ska du få ett mejl till den epostadress du angav. Klicka på “Verify email address”
1.2 2. Ge oss dina uppgifter
NOTE The signup for a GitHub repo is closed. Please email directy to Gustaf to get a GitHub repo. Using a IOOPM-UU GitHub repo for development is mandatory on the course.
För att du ska kunna få ett privat repo behöver du bli inbjuden
till vår GitHub-organisation IOOPM-UU. För att kunna ge dig ett
konto måste vi ha dina uppgifter. Börja med att klicka här och
fyll i ditt student-ID och ditt användarnamn på GitHub.

1.3 3. Tacka ja till inbjudan
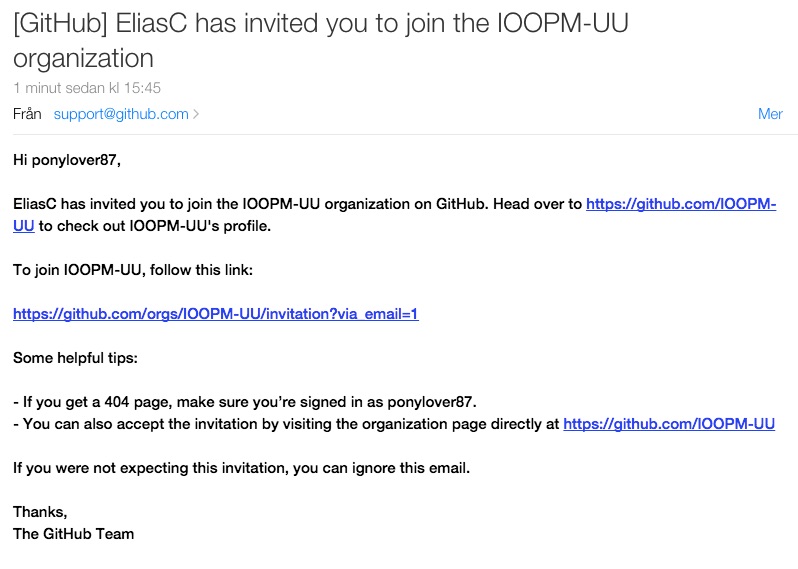
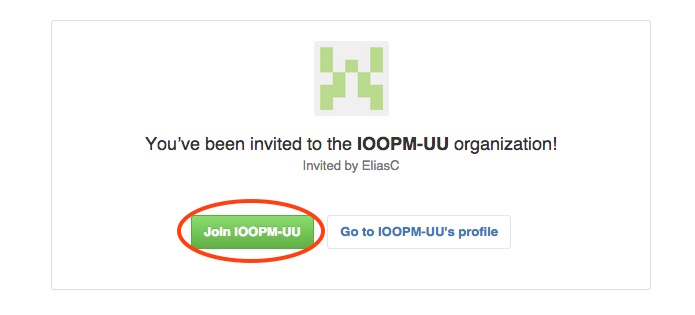
Så snart någon ser att du har skickat in dina uppgifter (vi kommer kolla listan ungefär en gång per dag under den första veckan) kommer vi att lägga till dig i vår GitHub-organisation. Du kommer då att få ett mejl med en inbjudan:
Om du går till http://www.github.com/ioopm-uu kommer det se ut ungefär så här: </p>
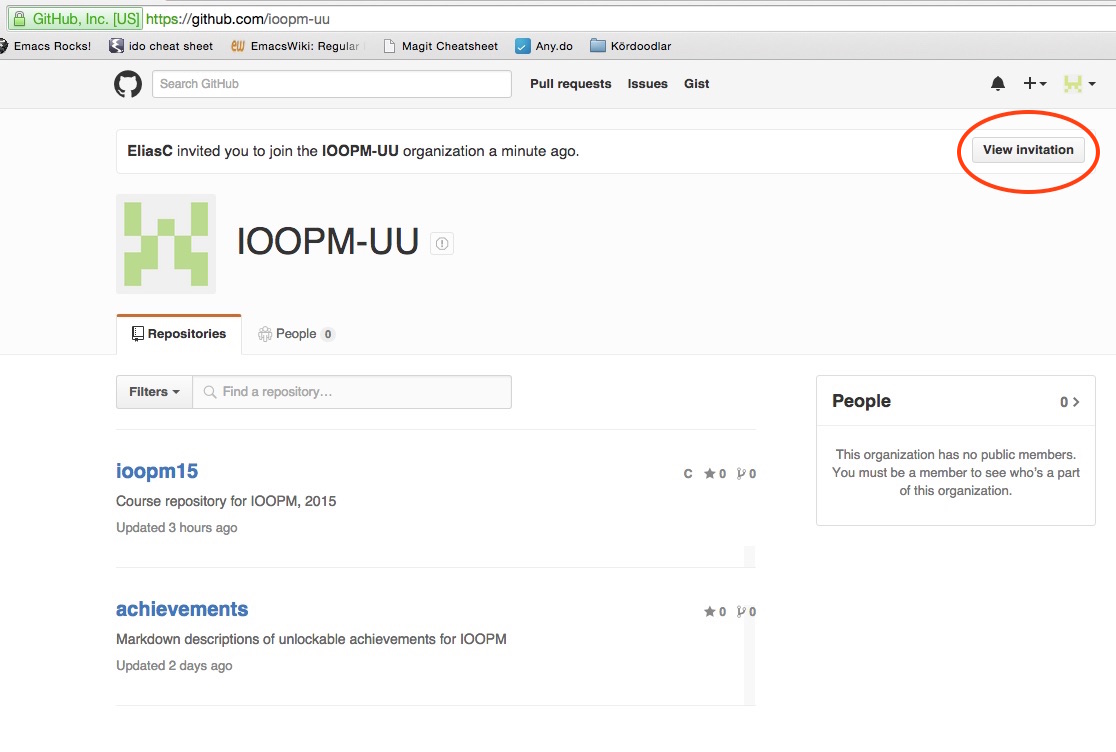
Klicka på ’View Invitation’ och välj “Join IOOPM-UU”.
1.4 4. Du är klar!
Det ska redan finnas ett repo som heter samma sak som ditt student-ID. Du kan söka efter ditt repo på organisationens förstasida. För att klona repot, kör “git clone https://github.com/IOOPM-UU/elias.castegren.1234.git” i en terminal (där “elias.castegren.1234” ersätts med ditt eget namn). Notera “.git” i slutet av adressen! Om du vill kan du ändra namnet på mappen där ditt repo hamnar – det påverkar inte repots namn på GitHub.
Ditt repo kommer att vara synligt för alla i din grupp, så du och den du programmerar med kommer att kunna arbeta i samma repo under tiden ni jobbar tillsammans. När samarbetet är klart kommer den vars repo inte användes vilja kopiera över koden till sitt eget repo så att den finns tillgänglig för nästa sprint också.
2 Setting up Git for Your Account
If you haven’t used git before on your machine, you need to tell git your user name and email address, which is part of every git commit. Use your real name and student email address:
$ git config --global user.name "John Doe"
$ git config --global user.email johndoe@example.com
%24%20git%20config%20--global%20user.name%20%22John%20Doe%22%0A%24%20git%20config%20--global%20user.email%20johndoe%40example.com%0A
Following this, set up emacs to be your default editor for
writing commit messages (etc.) like so:
$ git config --global core.editor emacs
%24%20git%20config%20--global%20core.editor%20emacs%0A
If you do not want to use emacs, or skip this step, the system’s default editor will be used, which can vary depending on what OS you are using.
3 Working With Your Git/GitHub Repository
3.1 Checking Out the Repository for the First Time
Checking out your repository for the first time will create a directory on your machine with the same name as the repo on GitHub. This directory should hold all your work during this course. All the hand-ins happen through your git repository.
Once you have been added to our GitHub organisation, there should be a GitHub account created for you with your student ID. Check it out like this:
git clone https://github.com/IOOPM-UU/first.last.1234.git ioopm
This creates a directory called ioopm on your machine where you
will be doing your work. You can name it what you want, but on
these pages we will assume you call it ioopm.
There will be one or more local copies of your repository (one for each machine where you are working, counting all thin clients as a single machine since they are just mirrors for accessing the same file system), and one remote copy on the GitHub servers.
The idea is to pull changes from the server and integrate them with your local copy, work locally on the local copy, and add a set of edits into a commit that represents some sensible, ideally coherent change to the code (e.g. implement feature X or add test for Y). Commits are pushed to the server so that we can pull them into another local copy, or accidentally destroy the local copy without losing work. When you work with others, multiple people can be pushing commits to the server while you are working on your local copy. To identify key commits, e.g., finishing an assignment, we tag these commits.
If you use version control correctly, most commits will not be tagged, because most commits will be a small improvement, inching towards feature completeness (or whatever the goal).
3.2 Pushing Local Commits to GitHub
If you haven’t made a local commit yet, and wish to update GitHub with your local changes, read under Making a Commit first, and then go back here.
If everything is set up correctly, i.e., you have cloned the repository according to the instructions, pushing your local commits to the server is as easy as pie:
$ git push
%24%20git%20push%20%0A
This should write a message to the terminal saying things went fine. However, in the event that things have changed on the server, your push is going to fail.
In that case, you are going to pull the changes from the server to your local repository and merge those with your changes before you can commit. Note that if someone pushes to the server again in the meantime, you are going to have to pull those changes too, etc.
The section on Downloading Updates from GitHub to Your Local Machine covers how to pull changes from the server.
Note that you can write
$ git push --tags
%24%20git%20push%20--tags%0A
To push all your tags to the server. Or simply git push origin <tagname> to push a single tag.
3.3 Making a Commit
To make a commit, you must first add the files to be committed. Instructions for that is found under Adding Files.
Once you have added the files in your commit, you can go ahead and make the commit. This means taking a snapshot of the current state of the added files. Here is an example of what this might look like:
$ git commit -m "...a good commit message..."
%24%20git%20commit%20-m%20%22...a%20good%20commit%20message...%22%0A
It is a requirement to write a commit message for each commit. If you omit the comment, one of two things will happen: either git will abort with an angry message, or it will fire up an editor in which you can write your message. If you try to write an empty message, it will complain and abort.
The reason for being so anal about the commit message is that it is important. It is quite common to want to look at the history of commits to search for e.g. where some bug might have been introduced. Unless there is a good high-level description, which ideally should be less than 50 characters and on a single line, the history is going to be even harder to navigate.
Here is an example from a git repo. These messages are not particularly good, but vastly superior to no messages or stupidities like “foo” and “changed some files”.
2017-06-04 22:41 Tobias Wrigstad     o [development] Added coin flip
2017-06-07 13:03 Kiko                M─┐ {origin/development} {origin/HEAD} Merge pull
2017-06-01 16:42 EliasC              │ o Add implicit constructor call in main class
2017-05-09 15:10 Karolina Nikamo     │ o desugar method calls, default params and fixes
2017-05-02 11:25 Casper Strömberg    │ o initial impl. of default params working
2017-05-01 22:03 Lowe Fredriksson    │ o pdefault=Nothing in awaitParam to make the com
2017-05-01 20:48 Karolina Nikamo     │ o started with default parameters
2017-04-07 12:08 Casper Strömberg    │ o Parsing and input default fields to AST
2017-06-02 12:07 EliasC              o │ Fix bug when printing non-sugared strings (#81
2017-06-01 00:15 Kiko                o─┘ cast print (#811)
2017-05-30 15:01 helanhalvan         o Adding Pedestrian simulation stress test (#794)
2017-06-04%2022%3A41%20Tobias%20Wrigstad%20%20%20%20%20o%20%5Bdevelopment%5D%20Added%20coin%20flip%0A2017-06-07%2013%3A03%20Kiko%20%20%20%20%20%20%20%20%20%20%20%20%20%20%20%20M%E2%94%80%E2%94%90%20%7Borigin%2Fdevelopment%7D%20%7Borigin%2FHEAD%7D%20Merge%20pull%0A2017-06-01%2016%3A42%20EliasC%20%20%20%20%20%20%20%20%20%20%20%20%20%20%E2%94%82%20o%20Add%20implicit%20constructor%20call%20in%20main%20class%0A2017-05-09%2015%3A10%20Karolina%20Nikamo%20%20%20%20%20%E2%94%82%20o%20desugar%20method%20calls%2C%20default%20params%20and%20fixes%0A2017-05-02%2011%3A25%20Casper%20Str%C3%B6mberg%20%20%20%20%E2%94%82%20o%20initial%20impl.%20of%20default%20params%20working%0A2017-05-01%2022%3A03%20Lowe%20Fredriksson%20%20%20%20%E2%94%82%20o%20pdefault%3DNothing%20in%20awaitParam%20to%20make%20the%20com%0A2017-05-01%2020%3A48%20Karolina%20Nikamo%20%20%20%20%20%E2%94%82%20o%20started%20with%20default%20parameters%0A2017-04-07%2012%3A08%20Casper%20Str%C3%B6mberg%20%20%20%20%E2%94%82%20o%20Parsing%20and%20input%20default%20fields%20to%20AST%0A2017-06-02%2012%3A07%20EliasC%20%20%20%20%20%20%20%20%20%20%20%20%20%20o%20%E2%94%82%20Fix%20bug%20when%20printing%20non-sugared%20strings%20%28%2381%0A2017-06-01%2000%3A15%20Kiko%20%20%20%20%20%20%20%20%20%20%20%20%20%20%20%20o%E2%94%80%E2%94%98%20cast%20print%20%28%23811%29%0A2017-05-30%2015%3A01%20helanhalvan%20%20%20%20%20%20%20%20%20o%20Adding%20Pedestrian%20simulation%20stress%20test%20%28%23794%29%0A
Here are some opinons about how to write commit messages:
- How to Write a Git Commit Message
- Anatomy of a “Good” commit message
- Useful Tips for writing better Git commit messages
The last link, for example, contains this list of rules:
- Separate subject from body with a blank line
- Limit the subject line to 50 characters
- Capitalize the subject line
- Do not end the subject line with a period
- Use the imperative mood in the subject line
- Wrap the body at 72 characters
- Use the body to explain what and why vs. how
3.4 Adding Files
Add files using the git add command in the terminal:
$ git add list.h list.c
%24%20git%20add%20list.h%20list.c%0A
This is often referred to as staging in Git parlance.
To check what files have been changed (or added and not ever
checked in yet), use git status for a listing. To restrict
yourself to the current directory and subdirs, use git status -s
..
DO NOT add generated files like a.out or list.o etc. These
are easy to generate from the source files when/if you want them.
Such files tend to be quite specific for the system where they
were built, and it may well be that an a.out executable that
works on machine A does not work on machine B. By not making these
files globally visible, you can avoid many strange errors.
Also, do not backup temporary files and backup files from Emacs
ending with a ~ etc. Since we are using a version control
system, there is no need for additional backup files.
If you are on macOS, you may have strange files called e.g.
.DS_store and __MAC_OS etc. Don’t commit those either. They do
not belong in a repository.
3.5 Tagging a Commit
Git allows us to tag a commit as a special mark. For example, we might mark a certain commit as Release 4.3.1 so that we can go back to this particular release in the future if needed, e.g., to fix a bug or retrofit a security patch or whatever.
On the course, we are going to use tags to mark finished assignments and also discrete labelled steps in assignment one (for example).
To list all tags for a git repo, simply write git tag. In the
beginning, you will have no tags.
To tag a commit, a so-called lightweight tag will do fine. To tag
the current commit assignment1_done, meaning that we can check
it out to get a working assignment 1, simply do the following:
$ git tag assignment1_done
%24%20git%20tag%20assignment1_done%0A
IMPORTANT: Note that, by default, git push does not transfer tags to remote
servers! Thus, as a final step to tagging your commits, you must
explicitly push tags: git push origin <tagname> where
<tagname> is e.g., assignment1_done, or write git push --tags
followed by a normal git push to push both tags and normal commits.
If you realise that mistagged something, or you later find a bug
so that you want another commit to be the finished assignment one,
use a versioning scheme where you create a new tag but add _v1
to its end. Thus, we can have the following:
$ git tag
assignment1_step0
...
assignment1_step14
assignment1_done
assignment1_done_v1
assignment1_done_v2
$
%24%20git%20tag%20%0Aassignment1_step0%0A...%0Aassignment1_step14%0Aassignment1_done%0Aassignment1_done_v1%0Aassignment1_done_v2%0A%24%0A
In this case, assignment1_done_v2 will count as the finished
assignment one as it has the highest version number.
3.6 Pulling Updates from GitHub to Your Local Machine
In git parlance we talk about fetching and pulling changes. For simplicity, we are only talking about pulling here, which essentially means fetching and subsequently integrating the changes with your local copy.
When you pull changes from the server, you have two options: merge and rebase. A nice introduction to these can be found here.
Merge looks like this:
$ git pull
%24%20git%20pull%20%0A
It will pull the changes from the server and merge them with your
local changes. If there are conflicting edits that cannot be
resolved automatically, you will have to resolve these manually,
and the resolved changes will eventually be contained in a commit
of its own. Thus, it is likely that if you do git pull, you will
end up creating an additional commit if things have moved on the
server.
Rebase looks like this:
$ git pull --rebase
%24%20git%20pull%20--rebase%0A
When you pull with the --rebase flag, git will download the
change set and insert it in the commit history before your
commit. Essentially pretending that you made these edits “on top”
of the current state on the server. If all goes well in the merge,
the git history stays a straight line, making it easier to travel
back in time and still have working and sensible code.
There are pros and cons with both ways of integrating changes, but
the way we are going to use git on this course, I would recommend
to always use git pull --rebase.
Questions about stuff on these pages? Use our Piazza forum.
Want to report a bug? Please place an issue here. Pull requests are graciously accepted (hint, hint).
Nerd fact: These pages are generated using org-mode in Emacs, a modified ReadTheOrg template, and a bunch of scripts.
Ended up here randomly? These are the pages for a one-semester course at 67% speed on imperative and object-oriented programming at the department of Information Technology at Uppsala University, ran by Tobias Wrigstad.
4 More
Baserad på anteckningar av Elsa Rick 2015.
4.1 Ångra etc.
git reset HEAD filnamn- ångrar “add”git checkout filnamn- motsatsen till “add”. Om du har ändrat i en fil men inte vill spara ändring. Obs! Om du checkout:ar en fil försvinner alla dina ändringar i den filen!git rm filnamn- ta bort en fil från ett repo (ändringen kommer med i nästa commit)
4.2 Branching
git checkout -b branchnamn- skapa branchgit branch- se alla brancher du har tillgång tillgit branch -r- se alla brancher, även de du inte har lokaltgit checkout branchnamn- byt branch till branchnamngit push origin branchnamn- pusha upp dina commits i den lokala branchen branchnamn till GitHub. Till exempel,git push origin masterför att pusha till master.git pull origin master- dra ner master från repot online
Om du vill merge:a ändringar i en lokal branch med master efter en pull som ovan:
git checkout origin branchnamn- ställ dig i branchnamngit merge origin/master- merga branchnamn med din lokala master
4.3 Hämta existerande branch
git fetch- Hämta ändringar från GitHubgit checkout branchnamn- Efter det här står du i branchnamn
4.4 Övrigt
git remote -v- se vilka repon du är kopplad till
Se till att alltid stå i rätt branch!!!