SIMPLE – A Minimalistic Programming Methodology
Table of Contents
- 1. SIMPLE: A Programming Methodology
- 2. Running Example: The Simple Warehouse
- 3. The SIMPLE Approach
- 3.1. Step 1. Think a little.
- 3.2. Step 2: Code a little.
- 3.3. Step 3: Think a little more.
- 3.4. Step 4: Code a little more.
- 3.5. Intermission: Developing in Increments
- 3.6. Step 5: Remove the Cheats
- 3.7. Step 6: Think a little – Code a little (Seems familiar?)
- 3.8. Step 7: Think a little – Code a little (again)
- 3.9. Step 8: Think a Little – Code a Little
- 3.10. Step 9, and beyond
- 3.11. Summary and Conclusions
- 4. A Summary of SIMPLE in Ten Steps
- 5. Tickets, Tasks and Post-it Stacks
- 6. The Three Rules of Cheating
- 7. Dodging: Not Quite Cheating
Nu följer en sammanfattning på svenska. Resten av dokumentet på engelska.
- Gör en work breakdown structure på hög nivå, och läs specifikationen och leta specifikt efter:
- verb (funktioner/beteende), eller
- eller substantiv (data/objekt/klasser).
- Skriv kod för att pröva om du tänkt rätt (tänk på vad som är rätt och hur man kollar det)
- Ha alltid ett fungerande program
- Kompilera efter varje förändring
- Kör programmet hela tiden för att hitta fel (eller ännu bättre — kör testen!)
- Dela upp varje problem i delproblem rekursivt, börja lösa först när något verkar enkelt
- Dela upp varje delproblem i mindre steg, börja med de enklaste, och spara loopar till sist
- Om möjligt, börja med en straight-line-version (alltså utan if-satser)
- När den fungerar lägg till eventuella if-satser en i taget
- Om du skriver en loop, gör ovanstående två steg först och lägg till loopen sist
- Fuska (cheat) varje gång du riskerar att fastna
- Skarva (dodge) för att förenkla specifikationer och skapa fler enklare delsteg
- Växla mellan att
- tänka,
- koda, och ibland
- refaktorera (speciellt dina fusk och skarvar).
1 SIMPLE: A Programming Methodology
This text introduces SIMPLE, a framework for programming. It is not a design methodology. SIMPLE does not specifically address testing. This is not to be interpreted as testing is unimportant – quite the opposite, as will be clearer as we go.
In a nut-shell SIMPLE dictates that you:
- Use the specification in a structured manner to do both function design and data design.
- Work in an incremental fashion, by solving many simple problems instead of few complex ones.
- Always have a working program that you can run and test.
- Compile continuously.
- Test continuously, preferably automated but at least manually.
- Write straight-line code first, before complicated branches and loops.
- Use tricks – cheating and dodging – to keep programming simple, and push problems into the future.
To exemplify, we will be using an version of an old assignment on the course.
2 Running Example: The Simple Warehouse
The simple warehouse program is an information system for managing the contents of a storage facility for different kinds of wares. Every ware in the warehouse has a name, a description, a storage location, a pricetag, information about the number of items of the particular ware stored in the warehouse, and the cost of each item. A storage location is a “section” (a single letter a-z), plus a shelf (an integer).
The simple warehouse program manages a database of wares and supports the following operations:
- Adding a ware
- Removing a ware
- Editing the information about a ware
- Printing the information for a specific ware
- Listing all wares in the database
- Undoing the last action
- Quitting the program
When starting the program, the user is presented with the main
menu with the above alternatives and picks a choice by entering
the first letter of each alternative, i.e., A, R, E, P,
L, U, or Q.
When choosing to quit, the user is prompted with a yes/no
question: do you really want to quit? If the answer is Y, the
program exits. If the answer is N, the program displays the main
menu again. If the answer is anything other than Y or N, an
error message is printed and the question repeated.
When choosing to add a ware, the user is prompted with five consecutive dialogues asking her to enter the required information for a ware:
- Name
- Description
- Storage location
- Price
- Amount
The program then displays the information back to the user and asks whether this is correct or not. The user has three options:
- Edit the information
- Save the information
- Abort
The choice is again indicated by entering the first character of each option. The first alternative allows the user to re-enter one piece of the required information for a ware after which the editer ware is displayed again with the same question as above. The save alternative saves the information to the database and then returns to the main menu. The abort alternative returns to the main menu without saving.
The rest of the actions on the main menu should be fairly self-explanatory.
3 The SIMPLE Approach
The most fundamental principle of SIMPLE is to always have a working program.
By a working program is meant a program that compiles without warnings or errors, and runs. In the beginning, the program is not going to do anything useful, which is fine.
The SIMPLE approach is all about adding functions to the program little by little until it suddenly is finished.
By always having a working program, it is easier to test the program, and the most shallow bugs can often be caught by just running the program and spotting the error. Furthermore, working with a program that runs is generally much more humanly rewarding and avoids the scary feeling of “not having anything” for a long while until finally the individual pieces are connected and a program magically appears.
I am supposed to write a program. Where do I start?

This is exactly the question SIMPLE is trying to answer. Along with the question, when am I done? We will now proceed by walking through a number of steps, and stopping and recapping once in a while.
3.1 Step 1. Think a little.
The most important answer to this question is about where you should not start: don’t start to code (yet)! Before we start to code, we should make sure to understand something more about the program. The goal is to make sure we have a basic understanding of what the program is supposed to accomplish, but not yet care about how it should accomplish it.
To get a feeling for what the program is trying to accomplish, we mine the specification. This means re-reading it, looking for some particular kind of information. To understand the program’s core behaviour, we pay close attention to the verbs and actions. Using a pen to underline or highlight them is not a bad idea.
For concreteness, I am copying in parts of the specification from above, highlighting as I go.
The simple warehouse program is an for … letter a-z), plus a shelf (an integer).
The simple warehouse program manages a database of wares and supports the following operations:
- Adding a ware
- Removing a ware
- Editing the information about a ware
- Printing the information for a specific ware
- Listing all wares in the database
- Undoing the last action
- Quitting the program
When starting the program, the user is presented with the main menu with the above alternatives and picks a choice by entering the first letter of each alternative, i.e.,
A,R,E,P,L,U, orQ.When choosing to quit, the user is prompted with a yes/no question: …
Looking at the text above, I have a pretty good overview of what the program is supposed to do at a high-level. Of course, this specification is extremely simple by listing the main menu with a lot of actions, but even if it didn’t, picking the actions probably would not be that much harder.
Now, I take a piece of paper and write these things down. A mindmap is usually a good way to capture hierarchical structures.
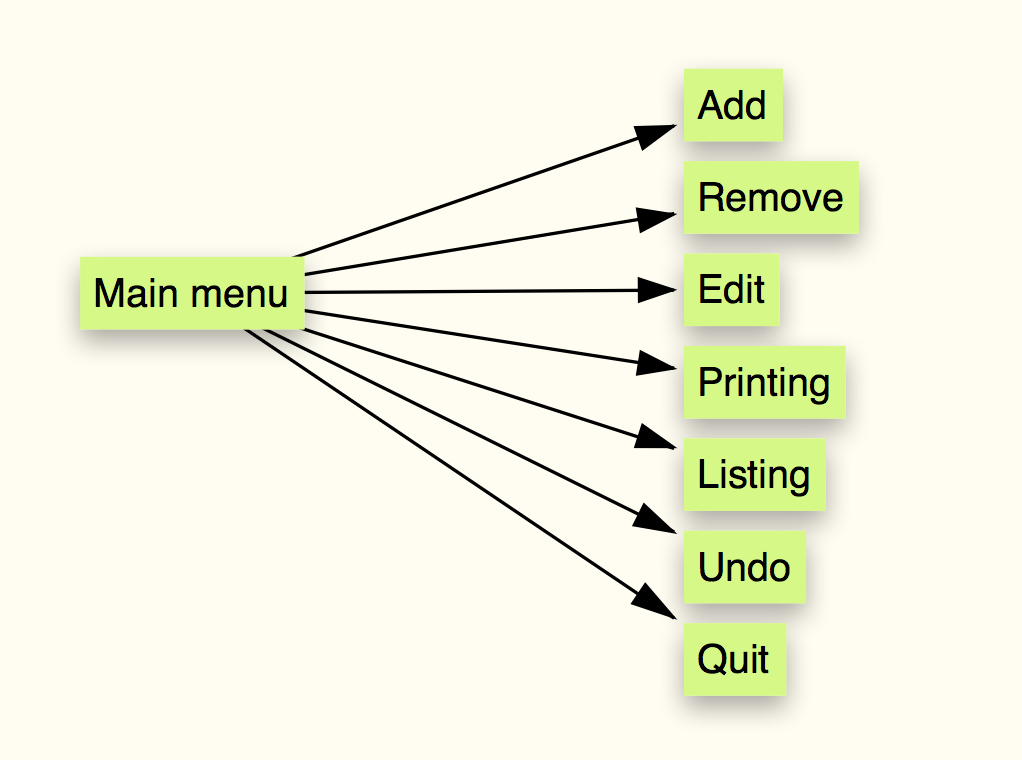
Figure 2: Initial mind map of actions in the program
The mind-map tells me what actions that the program should support, but so-far nothing about how they should be implemented. So far, that’s fine.
This is what we are doing: We are abstracting and compartmentalising. If we tried to understand the entire system before starting to code, we would probably never start to code, because it is very hard to know when you truly understand something. Some people are good at convincing themselves that they “get it”, regardless of whether it is true or not. Others are good at convincing themselves that they don’t. The key is to not get into a situation where this matters. At least not yet.
What we are going to do is the following: we are going to alternate between thinking a little and coding a little. We are going to think just enough so that we understand what is a plausible next step forward. Then we are going to evaluate whether that was a good step or not by coding. This is good, because coding is a good way to understand sloppily formulated ideas. By forcing us to concretise, coding challenges us to understand what it is we understand.
3.2 Step 2: Code a little.
Following the most fundamental principle of SIMPLE, we start with the minimal working program. If we are using C, we would probably write something like this:
#include <stdio.h>

int main(void)
{
  puts("Welcome to my warehouse program!");
  return 0;
}
%23include%20%3Cstdio.h%3E%0A%0Aint%20main%28void%29%0A%7B%0A%20%20puts%28%22Welcome%20to%20my%20warehouse%20program%21%22%29%3B%0A%20%20return%200%3B%0A%7D%0A
This program is pretty much hello world, but it compiles and runs.
Now, we take the actions from the mind-map and turn them into functions. For example, for “add”, we do:
// TODO: implement
void add_action(void)
{
  puts("Add action is not implemented yet");
}
%2F%2F%20TODO%3A%20implement%0Avoid%20add_action%28void%29%0A%7B%0A%20%20puts%28%22Add%20action%20is%20not%20implemented%20yet%22%29%3B%0A%7D%0A
And similar functions for all the other actions. We do this in order to have placeholders for code that we are going to write. Again we want to compartmentalise as much as possible: by focusing on just one small thing at a time, each problem is going to not just seem simple, but be simple. And that is one of the secret sauces to success. (More ingredients are coming up later.)
Between each function you add, compile the program.
Compile Early. Compile Often.
Unless you are looking for trouble, or are writing live code in front of an audience and are desperately trying to come across as a human compiler, you really want to compile your code all the time.
When you are new to a programming language, make a habit to compile after each edit. After a while, you will be able to go up to a few lines. Then a bit more, etc.
The reason for this is to compartmentalise your errors too! If you write 100 lines of code before you try to compile, you are likely to get 50 errors. Unless you are hardened by experience, this can be an insurmountable and cause you to give up. The nastiest compiler errors always happen in the code you wrote more than one hour ago. Not because you were a worse programmer then, but because it was one hour ago! You probably don’t remember what you were thinking back then, so you have to work hard at retracing your steps. If you try to make sure the code compiles every two minutes, logic dictates that solving these bugs is way way easier. Good programmers likes easy.
A Note About Compiler Errors
If for some reason you do get a whole page of compiler errors there are four important things to do, two of which are really hard even for a seasoned programmer:
- Don’t panic!
- Read the error messages!
- Address the errors one by one and in the order they were printed on the screen.
- Recompile all the time, and always after addressing each error.
Compilers are usually really bad at printing readable error messages. But you can learn how to read them. It will pay off because 90% of the time, there will be 10 or so errors. Focus on learning those first! (Seasoned programmers often just read the line number information, and jump there to fix the error themselves. This is just stupid, but very human.)
It is also quite common for compilers to become confused by errors earlier in the code. Compilers read like Westerners, i.e., top-down left-right. Often an error on line N cause one or more errors on lines N+X and N+Y, and since the compiler in the general case cannot rule out that the errors are unrelated, it prints all of them. Consequently, if the compiler says you have 10 errors, it is more likely less than 10, sometimes just one. The error that appears closest to your cursor on the prompt after compiling is therefore more likely to be a “faux error” than the first error that the compiler printed. Don’t waste time fixing something that does not need fixing. (Seasoned programmers sometimes get carried away and forget this too.)
Since one error often create “faux errors” later in the code, it is a very good idea to recompile all the time while fixing compile errors. It may be that fixing one error closes all of the remaining ones. Also, it is not uncommon to introduce a new error while you are fixing another one, so recompile often to make sure that the error number goes down steadily.
3.3 Step 3: Think a little more.
We now have a working program that does absolutely nothing. Let’s start adding some functionality to our program following the specification.
The first six action all require either that there is some data in the program, or that we are able to add some data. We haven’t done any data design yet, so if we want to start with these, we should that. However, the last action, quitting, is very simple and does not do much so that is a good starting point.
We now go back to our mind-map and extend the specification of quit.
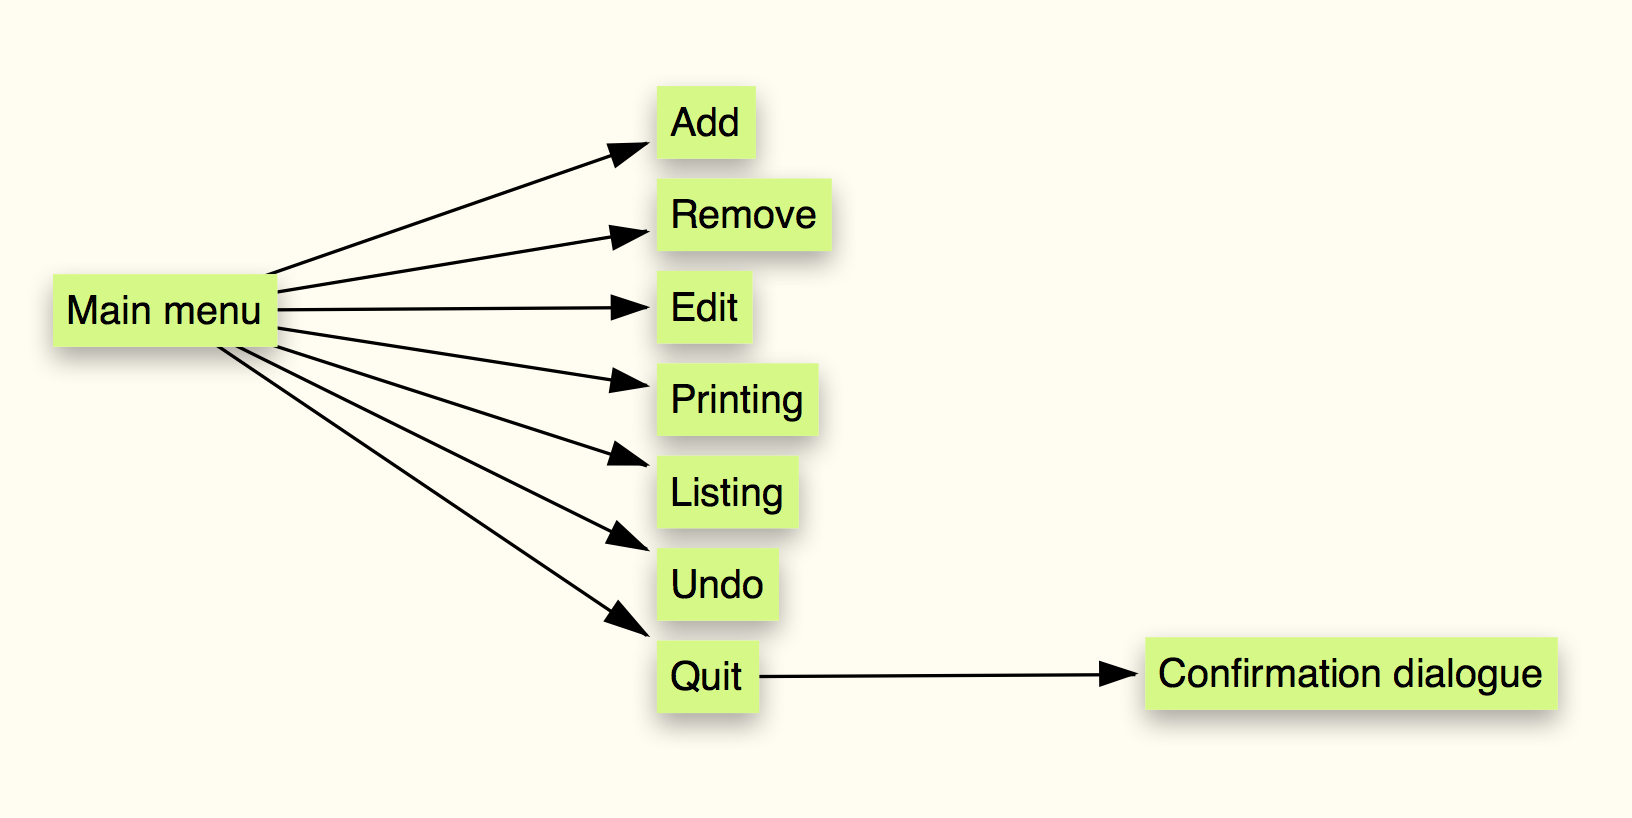
Figure 3: Second mindmap of the program
Re-reading the specification, we now know that triggering quit
should enter into a confirmation dialogue, and if the user replies
Y, then we quit, if N we return to the main menu, otherwise
repeat the question.
3.4 Step 4: Code a little more.
To keep the program as simple as possible, we are not going to add
functionality for choosing an action in the main menu just yet.
That’s not needed, because the only thing we are going to
implement is quit. So, although it is futile, let’s extend the
program so that when we run it, it asks if we want to quit. To
this end, we will add a while loop that loops forever and that in
each turn of the loop asks us whether we want to quit. This will
allow us to test both the yes and no answers.
#include <stdio.h>

int main(void)
{
  while (true)
    {
      puts("Welcome to my warehouse program!");

      if (quit_action()) break;
    }
  return 0;
}
%23include%20%3Cstdio.h%3E%0A%0Aint%20main%28void%29%0A%7B%0A%20%20while%20%28true%29%0A%20%20%20%20%7B%0A%20%20%20%20%20%20puts%28%22Welcome%20to%20my%20warehouse%20program%21%22%29%3B%0A%0A%20%20%20%20%20%20if%20%28quit_action%28%29%29%20break%3B%0A%20%20%20%20%7D%0A%20%20return%200%3B%0A%7D%0A
Once this edit is done, we compile and run the program. Just to be
sure we did not break anything. But oh, it does! quit_action() must
first be updated to return a bool. We fix this and add a return
false; as the default return and also include stdbool.h at the top
of the file.
Moving on, we now have a function quit_action() that looks like
this:
// TODO: implement
bool quit_action(void)
{
  puts("Quit action is not implemented yet");
  return false;
}
%2F%2F%20TODO%3A%20implement%0Abool%20quit_action%28void%29%0A%7B%0A%20%20puts%28%22Quit%20action%20is%20not%20implemented%20yet%22%29%3B%0A%20%20return%20false%3B%0A%7D%0A
Our goal now is to implement the behaviour of the specification which was just re-iterated above. We are going to do this in a few small increments. (I will return in a little bit to how to come up with good increments.)
- Print confirmation question
- Read input
- Handle
Ycase - Handle
Ncase - Handle remaining cases
Increment 1 is easy. Just change the existing puts():
// TODO: implement
bool quit_action(void)
{
  puts("Do you want to quit? [Y/N]");
  return false;
}
%2F%2F%20TODO%3A%20implement%0Abool%20quit_action%28void%29%0A%7B%0A%20%20puts%28%22Do%20you%20want%20to%20quit%3F%20%5BY%2FN%5D%22%29%3B%0A%20%20return%20false%3B%0A%7D%0A
Increment 2 is much harder. It requires us to know how to read input from a user in C. This is actually pretty complicated and there are many opportunities for errors. Therefore, I am going to use one of the best programming tricks ever – I am going to “cheat”. By cheating, I mean the following: I am going to assume the existence of a function that solves the problem for me. This makes increment 2 really simple:
// TODO: implement
bool quit_action(void)
{
  puts("Do you want to quit? [Y/N]");
  char input = get_char_input(); // <---- This line was added
  return false;
}
%2F%2F%20TODO%3A%20implement%0Abool%20quit_action%28void%29%0A%7B%0A%20%20puts%28%22Do%20you%20want%20to%20quit%3F%20%5BY%2FN%5D%22%29%3B%0A%20%20char%20input%20%3D%20get_char_input%28%29%3B%20%2F%2F%20%3C----%20This%20line%20was%20added%0A%20%20return%20false%3B%0A%7D%0A
You really need to understand that cheating is one of the best tools in the programming toolbox. You should use it all the time. The first rule of cheating is this:
If you don’t know immediately how to solve a problem, assume the existence of a function that solves this problem for you, and call that function.
This is great because usually when you are programming, you are going somewhere and you have a particular control flow in mind. Getting stuck implementing one step of this flow usually means your train of thought is interrupted and because your mind is now focused on solving the current step, you will have a harder time continuing where you got stuck once you are unstuck.
Aside: This is actually not so different from tricks used by surrealist authors experimenting with automatic text. There a standard trick is to choose a word or a first letter of a word that you revert to whenever your brain gets stuck. Here our actions are slightly more sensible. (At least to some.)
Like we did with the empty action functions from the start, we add
a dummy function to the file called get_char_input() to stay
true to the ideal of always having a working program:
// TODO: implement
char get_char_input() // <-- return type derived from the call-site
{
  return 'Y'; // <-- a good default because of how increment 3 is specified
}
%2F%2F%20TODO%3A%20implement%0Achar%20get_char_input%28%29%20%2F%2F%20%3C--%20return%20type%20derived%20from%20the%20call-site%0A%7B%0A%20%20return%20%27Y%27%3B%20%2F%2F%20%3C--%20a%20good%20default%20because%20of%20how%20increment%203%20is%20specified%0A%7D%0A
We can now compile and run our program as a kind of minimal testing.
Back to our increment 3, which is dealing with the base case of
the user inputting a Y:
// TODO: implement
bool quit_action(void)
{
  puts("Do you want to quit? [Y/N]");
  char input = get_char_input();
  if (input == 'Y') return true;
  return false;
}
%2F%2F%20TODO%3A%20implement%0Abool%20quit_action%28void%29%0A%7B%0A%20%20puts%28%22Do%20you%20want%20to%20quit%3F%20%5BY%2FN%5D%22%29%3B%0A%20%20char%20input%20%3D%20get_char_input%28%29%3B%0A%20%20if%20%28input%20%3D%3D%20%27Y%27%29%20return%20true%3B%0A%20%20return%20false%3B%0A%7D%0A
Increment 4 is dealing with the case of the user inputting a N.
Turns out it is already handled, as the function returns false
as a default. This leaves us with increment 5, which is the user
replying with something other than Y or N.
The reason why I left this case until now is because this is the case that removes some of the simplicity of the code we have been working on so far: we must now add a loop to this function to be able to repeat the question.
We start by wrapping the entire function inside a while. The exit
condition of the while is that input is either Y or N.
Otherwise, the specification dictates`, an error message shall be
printed and the question shall be asked again indefinitely. Here
is a first attempt at doing this:
bool quit_action(void)
{
  while (true)
    {
      puts("Do you want to quit? [Y/N]");
      char input = get_char_input();

      if (input == 'Y') return true;
      if (input == 'N') return false;

      puts("Only Y or N are valid answers!");
    }

  return false;
}
bool%20quit_action%28void%29%0A%7B%0A%20%20while%20%28true%29%0A%20%20%20%20%7B%0A%20%20%20%20%20%20puts%28%22Do%20you%20want%20to%20quit%3F%20%5BY%2FN%5D%22%29%3B%0A%20%20%20%20%20%20char%20input%20%3D%20get_char_input%28%29%3B%0A%0A%20%20%20%20%20%20if%20%28input%20%3D%3D%20%27Y%27%29%20return%20true%3B%0A%20%20%20%20%20%20if%20%28input%20%3D%3D%20%27N%27%29%20return%20false%3B%0A%0A%20%20%20%20%20%20puts%28%22Only%20Y%20or%20N%20are%20valid%20answers%21%22%29%3B%0A%20%20%20%20%7D%0A%0A%20%20return%20false%3B%0A%7D%0A
Note how I insert “paragraph breaks” into the code to capture what belongs together, and to help the reader “breathe”. Asking the question and getting the reply feels like two related concepts. The two checks of the exit conditions are clearly also related. Thus, I group these together by separating them with a paragraph, and also put another paragraph before the error which is the logical conclusion of the function.
Also note that I removed the // TODO: implement comment since
the function is now properly implemented, modulo the cheat – the
call to the (yet) non-existent function.
3.5 Intermission: Developing in Increments
The quit_action() function was developed in a series of steps.
The choice of the steps was very deliberate. Here are the rules to
follow:
- If there is any kind of branching, start with the most basic interesting case first
- In our example, Y and N are equally basic but only Y leads to something interesting, i.e., exits the program. The non yes or no cases require retrying which is more complicated, so we delay those even further. In the end, the order is Y, N, and “the rest”.
- Always finish a straight-line version first
- This means that any code that involves loops, you start by focusing on getting one iteration of the loop working in the working program. Once that is done, you can more easily wrap the working code inside a loop. Note that by this rule, the Y case would still be implemented before “the rest” even if Y called some other functions to save the database etc.
- Each increment should accomplish something sensible
- Each increment should result in a working program.
- Each increment should ideally have a testable outcome
- For example, when we implemented (skipped…) increment 4, we
should also have changed the
get_char_input()to return N to test this. And similar for increment 5.
Now: back to the running example.
3.6 Step 5: Remove the Cheats
We have finished quit_action(), but mostly because we cheated. To
finish implementing this part of the program, we will now remove
the cheat by implementing get_char_input(). However, the reason why
we didn’t write this piece of code down immediately from the start
was because we thought it was complicated and did not know exactly
how to do it. So, how do we proceed now?
Well, we cannot magically suddenly grasp how to read user input. This knowledge generally comes from somewhere. Let’s cover the three most basic cases:
- Google/Stack Exchange
- A text book
- Man pages
3.6.1 Man Pages
Posix compliant operating systems have a man command that brings
up the manual for a certain topic. For example, if you write man
printf, you will get the manual page for printf and associated
functions. The associated functions bit is key – often you know
how to do something related, but maybe not this particular case.
For example, you may know how to read formatted data from the
terminal with scanf, and then you can use man scanf to find
out about fscanf that reads formatted data from a file. The man
pages are a great tool to know because they are such quick access
to information, usually at a much higher quality (but less
specific) than Stack Exchange etc.
3.6.2 A Text Book
You may have a text book on the subject. If so, great. Figuring out what to look for might be tricky. You first have to make the connection to I/O, and then you must go through 50 pages to find a mention of the specific functionality you are looking for. However, if you do, a text book usually gets you there. As long as you are doing something quite basic.
3.6.3 Google / Stack Exchange
This is usually the easiest option. And a really good one at that. A problem with code from Stack Exchange or random blogs is that you may not always understand exactly what the code does, and why. You normally end up with 40+ suggested solutions to your problem, 10 of which use libraries that you don’t have or know how to include, another 10 that you cannot get to compile because of reasons, leaving another 20 which you must somehow chose between.
So how do you do that? Actually, in the same way as with the text book or examples from man pages: you try it out.
Here is the golden rule of trying code out: start with a new empty file that just tests the code you’re trying to get to run.
The reason for this is compartmentalising. It may be that the reason why you are stuck on something is because there is an error in your code somewhere that breaks some part. Pasting random code into the place where you believe that the error is, will probably not uncover anything. It will just cause you to go through all 20 versions and (erroneously) conclude that none of them works.
Also, by isolating the code you are looking at in a single file, there is a lot less disturbance. You want to be working at all times with the smallest possible thing that can work. Remember: good programmers like lazy.
If the problem is getting user input, then writing a small test program for that is easy. To simplify copying the solution across to the “real program” you can even name the functions right from the start:
#include <stdio.h>

char get_char_input()
{
  // paste code here
}

int main(void)
{
  printf("You pressed: '%c'\n", get_char_input());
  return 0;
}
%23include%20%3Cstdio.h%3E%0A%0Achar%20get_char_input%28%29%0A%7B%0A%20%20%2F%2F%20paste%20code%20here%0A%7D%0A%0Aint%20main%28void%29%0A%7B%0A%20%20printf%28%22You%20pressed%3A%20%27%25c%27%5Cn%22%2C%20get_char_input%28%29%29%3B%0A%20%20return%200%3B%0A%7D%0A
This program will call get_char_input() and print out the
character between single quotes to avoid confusion. We can now
spend the next 15 minutes on getting the code that we are finding
online to work in this file, and then simply copy
get_char_input() across to our other C file.
Make it Easy to Write Small Test Programs
The easiest way to understand how something works in programming is generally to test it out. To that end, make it really easy to start with an empty file, compile and run it. This could be hacking your editor, downloading a plugin to your IDE, or saving an empty file plus makefile in a directory that you simply copy to make a new “testbed” for something.
Understand that testing something out simplifies life tremendously, and that all minutes spent on simplifying simplification simplifies even more.
3.7 Step 6: Think a little – Code a little (Seems familiar?)
Now that we are done with quitting the program, it is time to move on to the next action. However, in order to get to the next action, we must first extend the main loop of the program so that the user can choose between whatever action we choose to implement next, and quitting.
Looking at the specification, the user’s input is again by reading
a character. Great that we have already implemented
get_char_input() to do exactly that. (If we hadn’t, we could
just rely on the existing cheat, but eventually we would have to
implement it of course.)
Following the instructions on how to develop in increments, etc.
and looking at how we implemented the dialogue in quit_action(),
we can relatively quickly write something like this:
#include <stdio.h>

int main(void)
{
  bool should_quit = false;

  while (!should_quit)
    {
      puts("Main menu:");
      puts("[A]dd ware");
      // ... <--- remaining actions, or just omit them for now
      puts("[Q]uit");
      char input = get_char_input();

      // Hmmm ... code formatting?
      if (input == 'A')      { add_action(); }
      else if (input == 'Q') { should_quit = quit_action(); }
      else                   { puts("Invalid choice!"); }
    }
  return 0;
}
%23include%20%3Cstdio.h%3E%0A%0Aint%20main%28void%29%0A%7B%0A%20%20bool%20should_quit%20%3D%20false%3B%0A%0A%20%20while%20%28%21should_quit%29%0A%20%20%20%20%7B%0A%20%20%20%20%20%20puts%28%22Main%20menu%3A%22%29%3B%0A%20%20%20%20%20%20puts%28%22%5BA%5Ddd%20ware%22%29%3B%0A%20%20%20%20%20%20%2F%2F%20...%20%3C---%20remaining%20actions%2C%20or%20just%20omit%20them%20for%20now%0A%20%20%20%20%20%20puts%28%22%5BQ%5Duit%22%29%3B%0A%20%20%20%20%20%20char%20input%20%3D%20get_char_input%28%29%3B%0A%0A%20%20%20%20%20%20%2F%2F%20Hmmm%20...%20code%20formatting%3F%0A%20%20%20%20%20%20if%20%28input%20%3D%3D%20%27A%27%29%20%20%20%20%20%20%7B%20add_action%28%29%3B%20%7D%0A%20%20%20%20%20%20else%20if%20%28input%20%3D%3D%20%27Q%27%29%20%7B%20should_quit%20%3D%20quit_action%28%29%3B%20%7D%0A%20%20%20%20%20%20else%20%20%20%20%20%20%20%20%20%20%20%20%20%20%20%20%20%20%20%7B%20puts%28%22Invalid%20choice%21%22%29%3B%20%7D%0A%20%20%20%20%7D%0A%20%20return%200%3B%0A%7D%0A
Here, I added printing of (part of) the main menu, a call to
get_char_input(), and I also changed the code a little to make
use of a should_quit() variable to control whether the main loop
should continue or not. The reason for this is simply because code
with fewer exit points is simpler to understand.
However, looking at this code and the code for quit_action(), I
notice that there is a small modicum of repetition. In both cases,
I have to handle the failure mode, i.e., when the user presses
something that isn’t part of the protocol.
Now refactoring enters into the picture. What I want to do now is
to improve the code for get_char_input() so that it can handle
the failure for me. A simple way to do that is to pass both the
question and the valid alternatives to the get_char_input()
function:
char input = get_char_input("Do you want to quit?", "YN");
char input = get_char_input("Choose menu item!", "AREPLUQ");
char%20input%20%3D%20get_char_input%28%22Do%20you%20want%20to%20quit%3F%22%2C%20%22YN%22%29%3B%0Achar%20input%20%3D%20get_char_input%28%22Choose%20menu%20item%21%22%2C%20%22AREPLUQ%22%29%3B%0A
The code for this is almost given in the specification of this
assignment, so won’t be repeated here. However, the resulting code
for main() is nice. Here rewritten with a switch statement just
for fun, and the main menu printed in its own function:
#include <stdio.h>
int main(void)
{
  bool should_quit = false;
  while (!should_quit)
    {
      print_main_menu();
      switch (get_char_input("Choose menu item!", "AREPLUQ"))
        {
        case 'A': add_action();                break;
        case 'R': ...                          break;
        case 'E': ...                          break;
        case 'P': ...                          break;
        case 'L': ...                          break;
        case 'U': ...                          break;
        case 'Q': should_quit = quit_action(); break;
        }
    }
  return 0;
}
%23include%20%3Cstdio.h%3E%0Aint%20main%28void%29%0A%7B%0A%20%20bool%20should_quit%20%3D%20false%3B%0A%20%20while%20%28%21should_quit%29%0A%20%20%20%20%7B%0A%20%20%20%20%20%20print_main_menu%28%29%3B%0A%20%20%20%20%20%20switch%20%28get_char_input%28%22Choose%20menu%20item%21%22%2C%20%22AREPLUQ%22%29%29%0A%20%20%20%20%20%20%20%20%7B%0A%20%20%20%20%20%20%20%20case%20%27A%27%3A%20add_action%28%29%3B%20%20%20%20%20%20%20%20%20%20%20%20%20%20%20%20break%3B%0A%20%20%20%20%20%20%20%20case%20%27R%27%3A%20...%20%20%20%20%20%20%20%20%20%20%20%20%20%20%20%20%20%20%20%20%20%20%20%20%20%20break%3B%0A%20%20%20%20%20%20%20%20case%20%27E%27%3A%20...%20%20%20%20%20%20%20%20%20%20%20%20%20%20%20%20%20%20%20%20%20%20%20%20%20%20break%3B%0A%20%20%20%20%20%20%20%20case%20%27P%27%3A%20...%20%20%20%20%20%20%20%20%20%20%20%20%20%20%20%20%20%20%20%20%20%20%20%20%20%20break%3B%0A%20%20%20%20%20%20%20%20case%20%27L%27%3A%20...%20%20%20%20%20%20%20%20%20%20%20%20%20%20%20%20%20%20%20%20%20%20%20%20%20%20break%3B%0A%20%20%20%20%20%20%20%20case%20%27U%27%3A%20...%20%20%20%20%20%20%20%20%20%20%20%20%20%20%20%20%20%20%20%20%20%20%20%20%20%20break%3B%0A%20%20%20%20%20%20%20%20case%20%27Q%27%3A%20should_quit%20%3D%20quit_action%28%29%3B%20break%3B%0A%20%20%20%20%20%20%20%20%7D%0A%20%20%20%20%7D%0A%20%20return%200%3B%0A%7D%0A
Now, we can compile and run the program again, and test that it
works to trigger add_action(), which will print “Add action is
not implemented yet”. Time to implement it!
3.8 Step 7: Think a little – Code a little (again)
A good candidate for this is adding a ware, because editing, removing, listing, undoing, etc. all presuppose the existence of some data in the database. Adding something new is often simpler than editing or removing. This means that is a good place to start.
It is now time to go back to the specification again, and read about the add action. We extend our mind-map accordingly:
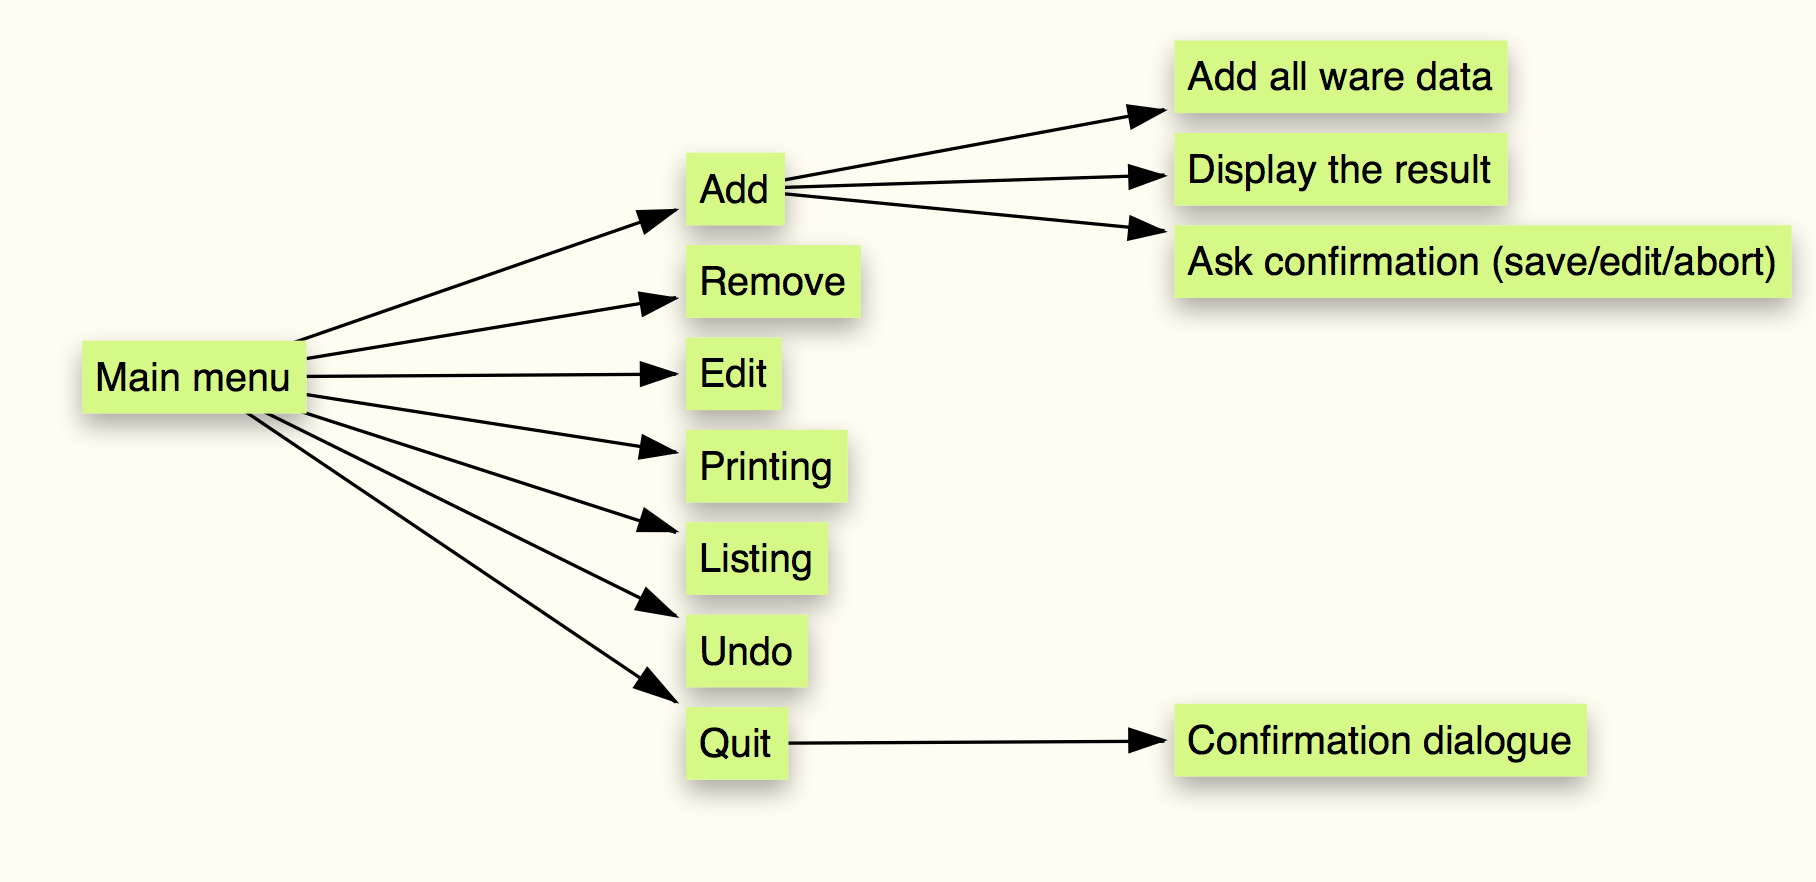
Figure 4: Third mindmap of the program
We have now arrived at a good place to do some data design. In other programs, we might have started with that if there weren’t any functions that did not manipulate any core data for the program. But what do we mean by core data?
Unsurprisingly, perhaps, the program’s core data is the central data for the program. A complicated program might have tons of different kinds of core data, but in our example, we are more lucky. To understand a program’s core data, we simply mine the specification again, this time looking for nouns. Let’s do that now!
Again, for concreteness, I am copying in the specification and highlighting as I go:
Every ware in the warehouse has a name, a description, a storage location, a pricetag, information about the number of items of the particular wares stored in the warehouse, and the cost of each item. A storage location is a section (a single letter a-z), plus a shelf (an integer).
The simple warehouse program manages a database of wares and supports the following operations:
- Adding a ware
- Removing a ware
- Editing the information about a ware
- Printing the information for a specific ware
- Listing all wares in the database
- Undoing the last action
- Quitting the program
Looking at the highlighted information above, and reading the surrounding text, a pattern emerges. There is a database, which stores wares, that each store name, description, storage location, pricetag, and number of items. There is also a mentioning of action, which makes sense: in order to undo an action, we need to somehow record what the program did just before, and enough information to undo it. We don’t know exactly what this information is yet, but that’s fine. It probably does not make sense to implement undo until there are actions to be undone. (Read more in the aside below.)
The specification gives us a (mostly) very good idea for a data
type for ware. Name and description are clearly strings. Price
and number of items (which I will be calling amount from now on)
are clearly integers. The storage location is less clear, however.
Rather that getting stuck on this detail, let’s cheat and assume
that there is a type storage_location_t that solves the problem.
Now, we can write the type for ware:
struct ware
{
  char *name;
  char *description;
  storage_location_t storage_location;
  int   price;
  int   amount;
};
struct%20ware%0A%7B%0A%20%20char%20%2Aname%3B%0A%20%20char%20%2Adescription%3B%0A%20%20storage_location_t%20storage_location%3B%0A%20%20int%20%20%20price%3B%0A%20%20int%20%20%20amount%3B%0A%7D%3B%0A
By cheating a little, we now have a type ware. However, in the
interest of making progress and working in an incremental fashion,
we are also going to apply another great simplification trick:
dodging.
Getting information from the user at all is a great first step in an incremental development methodology. Once that is done and works, we can start caring about making sure that the information is correct. It is time to dodge.
Dodging means temporarily simplifying the specification. In the current example, a good dodge is to say: for now, I am going to only store string data in wares, and worry about integers and storage locations later. This allows us to use a single function for reading input from the user to complete the entire specification for adding a ware, modulo saving it to the database.
Temporarily, we change to type of ware to this:
struct ware
{
  char *name;
  char *description;
  char *storage_location; // TODO: storage_location_t
  char *price;            // TODO: int
  char *amount;           // TODO: int
};
struct%20ware%0A%7B%0A%20%20char%20%2Aname%3B%0A%20%20char%20%2Adescription%3B%0A%20%20char%20%2Astorage_location%3B%20%2F%2F%20TODO%3A%20storage_location_t%0A%20%20char%20%2Aprice%3B%20%20%20%20%20%20%20%20%20%20%20%20%2F%2F%20TODO%3A%20int%0A%20%20char%20%2Aamount%3B%20%20%20%20%20%20%20%20%20%20%20%2F%2F%20TODO%3A%20int%0A%7D%3B%0A
And then we can make a version of get_char_input(), for example
get_string_input(). We will probably also cheat and assume its
existence on the first pass through the code. We will also cheat
and assume the existence of a add_to_db() function, which does
nothing except prints out the obligatory disclaimer of it not yet
being implemented.
Here is a list of suitable steps for almost implementing
add_action(). Each step notably results in a program that can
compile and run, but probably does not do anything useful.
- Read all the inputs as strings and save them into a ware
object, assuming the existance of several functions (This could
quite possibly be several increments.):
a.
get_string_input(), b.print_ware()(to print a ware to the user before answering the save, edit, abort), c.edit_ware(), (for when the user selects edit above) and d.add_to_db(). - Implement
get_string_input(). - Implement
edit_ware(). - In 1. above, we are writing straight-line code. No loops, and
the only branching is the calls to
edit_ware()andadd_to_db()based on the users input. This means we do not yet implement the case where the user makes an edit, gets a printout and makes the edit again. This support we add in this step. - Make price and amount ints in ware and replace the two calls to
get_string_input()with calls to an assumedget_int_input(). - Implement
get_int_input(). - Decide how to do the storage location. And implement that. This is likely several steps given that we cheated on the type for storage location before.
The last thing we will do is to deal with the database – a final piece of the puzzle missing to finish this action.
Multiple Possible Ways Forward
Undo is a good example of a choice in how we choose to go forward. For example, we could chose to implement undo for each action that we implement, i.e,. after add we implement undo add, after edit we implement undo edit, etc. Or we simply wait until all actions are implemented and implement undo for all of them in a single hit. There is no right or wrong here, just two different ways of working, each with its own merit. For example, it is easy to argue that implementing undo X right after implementing X is the best way because at this point, we probably have the best understanding of how X works. On the other hand, it is easy to argue that if we implement the entire undo behaviour at the same time, it is easier to come up with a clean design for it that will work for all cases. If we started with a design for undo add, we might not yet see all the information that must be saved. (For example, undo edit will require us to store the original values of the edited data!)
3.9 Step 8: Think a Little – Code a Little
Choosing the proper database design is of course very important for the program at hand. There are multiple alternatives ranging from simple to hard, for example:
- A statically sized array of wares
- A dynamically sized in-memory structure like a list or a tree
- An external database back-end
There is however one very important realisation at this stage and that is that right now, it does not matter (right now).
The rationale is that we are trying to piece by piece construct a piece of software that fulfils the specification. We are just about to wrap-up the part of the program that will be adding the first item in the database. We don’t have the code to remove items, edit them, etc. So really, we could not care less at this point how the database is designed.
This is a great opportunity to dodge again. This time, we are going to dodge in three discrete steps:
- The database holds only one single element
- The database is an array of fixed maximal size
- Make the final decision once the program’s done otherwise
The first database design will allow implementing everything except adding and removing with multiple wares, and listing multiple wares. The second design will allow us to do all that. The third design will make the program less of a Mickey Mouse program.
Following the first database design, we can now define a struct for the database like so:
struct db
{
  struct ware ware; // TODO: improve later
};

typedef struct db db_t;
struct%20db%0A%7B%0A%20%20struct%20ware%20ware%3B%20%2F%2F%20TODO%3A%20improve%20later%0A%7D%3B%0A%0Atypedef%20struct%20db%20db_t%3B%0A
Now, we can finally finish the implementation of add_action().
To do this, we will go through the program and make a few simple
changes:
- We want to create a
db_tvalue in main. - We want to pass a pointer to the
db_tvalue toadd_action(). - We want to pass a pointer to the
db_tvalue toadd_to_db().
Now we can implement add_to_db() like so:
void add_to_db(db_t *db, struct ware ware)
{
  db->ware = ware;
}
void%20add_to_db%28db_t%20%2Adb%2C%20struct%20ware%20ware%29%0A%7B%0A%20%20db-%3Eware%20%3D%20ware%3B%0A%7D%0A
And now we are done with add_action().
As we finish more actions and move on to the second database design, we simply update struct db:
#define Max_elements_in_db 128
struct db
{
  struct ware wares[Max_elements_in_db]; // TODO: improve later
  int size;
};
%23define%20Max_elements_in_db%20128%0Astruct%20db%0A%7B%0A%20%20struct%20ware%20wares%5BMax_elements_in_db%5D%3B%20%2F%2F%20TODO%3A%20improve%20later%0A%20%20int%20size%3B%0A%7D%3B%0A
That was easy, and now we can finalise more complex parts of out
program. Moreover, if we have isolated the how the database works
from the rest of the program correctly, only functions like
add_to_db() etc. will have to change as a result:
void add_to_db(db_t *db, struct ware ware)
{
  // Saves ware on the next available index and increase size by 1
  db->wares[db->size++] = ware;
}
void%20add_to_db%28db_t%20%2Adb%2C%20struct%20ware%20ware%29%0A%7B%0A%20%20%2F%2F%20Saves%20ware%20on%20the%20next%20available%20index%20and%20increase%20size%20by%201%0A%20%20db-%3Ewares%5Bdb-%3Esize%2B%2B%5D%20%3D%20ware%3B%0A%7D%0A
3.10 Step 9, and beyond
Think/code/refactor/remove cheats. Repeat until done. Find a good balance.
3.11 Summary and Conclusions
Almost all hard problems can be broken down into less-hard subproblems, which in turn can be broken down to even less-hard subsubproblems, etc. After a while of breaking work down into smaller and smaller tasks, the tasks finally become simple, and that is the right time to start solving them. That’s SIMPLE in a nutshell.
As soon as we hit a bump in the road – a problem we don’t know immediately how to solve, or don’t know how to solve well, or just cannot be bothered with solving right now – we keep things simple by cheating and dodging. We reserve ourselves that right by always making clear notes about our cheats and dodges and by promising ourselves that we will set things straight in the future. And by keeping our promises.
4 A Summary of SIMPLE in Ten Steps
- Start with a high-level work breakdown structure
- Mine your specification for data (nouns) and actions (verbs – behaviour/functions). Make simple drawings, e.g., mindmaps, to record your insights. Making things look easy is almost always good.
- Write code to test the validity of your thinking
- …not to drive the thinking! Thinking should invariably come before coding, especially thinking about how you check that your thinking is valid.
- Always have a working program
- In combination with cheating, this usually means inserting dummy functions.
- Compile after every change
- Fix errors now, not later. Fix errors one by one. Fix errors in the order they were printed. Take time to actually read the compiler message so you know you are fixing the right thing.
- Run the program “all the time” to spot errors
- This requires always working code – preferably in combination with automated test that don’t involve ocular inspection, etc.
- Recursively break your problems up into smaller sub problems
- Only start solving problems when they start feeling easy. Make a task for each problem or subproblem to put on the stack, take tasks from the stack in a reasonable order (preferably easiest first); when the stack is empty – you are done!
- Break each task up into increments and start with the easy ones
- Generate new tasks to put on the stack as you go. If suitable, start with a straight-line version (without any if-statements). When the straight-line version works add conditionals, one by one. Start with the most basic or the most insteresting cases. When you are writing a loop, do the above steps first and add the looping step last.
- Whenever you run the risk of getting stuck, cheat
- Don’t forget to push new tasks on the stack that undoes the cheating, later. This records the cheat, which is great.
- Use dodging to help breaking complex cases up into several less complex ones
- Don’t forget to push new tasks on the stack that undoes the dodge, later. This records the dodge, which is great.
- Alternate between thinking, coding and refactoring
- thinking – not so much that you get stuck, though,
- coding – but never without first thinking about what to code, and occasionally
- refactoring – especially to address your cheats and dodges.
Refactoring is good to do between larger tasks. Make it a habit to continuously go back and refactor your solutions so that recently gotten insights rub off on older code too.
Note that this is a simple programming methodology, not a fully-fledged software design methodology. This means that it will not scale to “large” software, but will work fine for relatively simple programs up to say a few thousand lines of code. Certain domains, especially mathematical domains, might benefit from more advance thinking before implementing because there are more “truths” in such domains than in more fickle domains, especially ones involving human users. Although the running example used a program with a user interface, SIMPLE works equally well with non-UI programs.
5 Tickets, Tasks and Post-it Stacks
Programming with SIMPLE revolves around breaking problems down into sets of smaller and smaller tasks. Actually, almost all programming works like that.
Our first problem was “implement an information system for a warehouse”. This is a very big and vague problem, so to solve it, we perused the specification to find the top-level actions that the system should support. We thus identified a set of tasks, one for each action, and started working through the tasks one by one. We carefully chose the order of tasks to make sure that we started as simple as possible and never worked on a task that could not be a part of the running program because it relied on another feature that wasn’t quite ready.
We are following a divide-and-conquer approach, where you
recursively break down tasks into increasingly smaller pieces
until each piece is trivially solvable. As is visible, from the
steps above, we do not strive to break everything down into simple
problems. For example, we started by doing quit_action() as soon as
we realised it was simple enough, without caring about breaking
down everything else first. The more you implement the program,
the more you will understand it. You will never understand the
program less than right at the start – therefore, trying to make
a detailed planning with that limited understanding is a bad idea.
Instead, tasks will be created as part of the implementation. At
every step of the way, you will have a pile of tasks to perform.
When this pile is empty, you’re done.
The cases where tasks are created in SIMPLE are ideally:
- As part of the initial identification of top-level tasks
- As part of the data design
- When you pick a task to implement, you usually start by breaking it down into several smaller tasks
- Cheating creates a new task for the cheating function
- Dodging creates one or more new tasks to undo the simplifications
Naturally, tasks are sometimes created because you forgot to create them elsewhere, or because of misunderstanding, etc.
Actually having a physical pile of tasks in front of you is not a bad idea. It is quite common in modern software development organisations to rely heavily on post-it notes for task planning and follow-up. You will have one or two post-it notes that you are currently doing, a growing pile of post-it notes that are done, and one pile that’s next. Physically moving something from doing to done or seeing a large stack of notes in the done pile is gratifying. Physically moving something from next to doing reifies a commitment. Glancing at a number of post-it notes in the next section of the paper or whiteboard where you keep your tasks is a quick way to get an overview of where you are headed.
Using a physical stack of post-it notes or some equivalent software is an excellent way to manage the constantly growing and shrinking tasks. Of course, adding notes in the code is great too, but why not both.
Regardless of how you manage your tasks, an important question is where you put new tasks when they are created – to the front (so they are next in line) or to the back (so they won’t be dealt with for a while). There is no simple rule but there is a SIMPLE guideline: simpler tasks go in front of more complicated tasks.
When you test your software, you may run into bugs or defects which aren’t of immediate importance. For each defect that you do not immediately fix, create a ticket, and put that in the task queue. A ticket is a task like any other, just one that’s about fixing something that’s inadvertently broken. Creating tickets for defects is a good way to avoid breaking the current flow by switching into debugging mode, and helps us remember it so it eventually gets fixed.
6 The Three Rules of Cheating
Cheating is one of the best tools in the programming toolbox, and a trick you should be using all the time. The rule of cheating is this (also repeated above):
If you don’t know immediately how to solve a problem,
assume the existence of a function
that solves this problem for you,
and call that function.
There is also a second rule of cheating:
If you write code that you think about as
Step 1; Step 2; Step 3; … Step n,
and one of the steps suddenly turns out to be
way longer/more complicated/more involved than the others,
assume the existence of a function that performs that step for you,
and call that function.
Finally, there is a third rule of cheating:
If you write straight-line code,
and you suddenly come across a step that you
just cannot be bothered with implementing right now,
assume the existence of a function that performs that step for you,
and call that function.
(Yes – I deliberately formatted them as poems.)
In addition to help you stay focused on the control flow you are
implementing and not get stuck in details, cheating has the
automatic side-effect of breaking down your code into smaller
chunks. It also isolates trickier code inside single functions.
For example, the logic for reading user input is now nicely
encapsulated inside the get_char_input() function and we can solve
this problem completely in isolation of the rest of the code for
quitting the program although that code depends on it.
By giving a proper name to each function invented by cheating, we make sure that the code reads more high-level, and it also helps us remember what problem the function in question should solve.
7 Dodging: Not Quite Cheating
When doing the initial database design, we made proper use of dodging twice to make immediate simplifications that help us make progress and construct good increments. Here are two examples of dodging guidelines:
If a feature has several similar yet not identical cases,
start by reducing them to the most basic case
and getting that to work.
and
If a feature involves a collection of objects,
investigate whether starting with just a single object
is possible and easier.
Dodging involves simplifying the requirements temporarily in order to create a simpler specification. The word temporarily is key here, and it is imperative that we have some system in place to help us remember what simplifications we have made to make sure we roll them back at some point and replace them (step by step) with the full specification.
By starting with a design of the ware struct where everything is a string, we have reduced the number of different input methods for wares from three to one, and also to the simplest one where input does not need any real checking. This way, we can write a program in which the user can input data into the database, and once that program is sufficiently implemented, we can add more input methods and change the types in the ware struct. Following the guidelines for increments, we implement support for:
- Name, description
- Price, amount
- Storage location
in this very order, which is the ascending order of complexity. That is is the fact is easy to see: all input is a valid string; integer input may fail if the user types something other than a number; storage location requires two different inputs to be correct.
Finally, by starting with a database with only one item we have just enough to be able to have a working program in which we do pretty much everything except have more than one ware in the database. The logic for everything except writing to the database should be exactly the same for the entire program regardless of whether the database is an array of wares, a binary tree, etc.
Questions about stuff on these pages? Use our Piazza forum.
Want to report a bug? Please place an issue here. Pull requests are graciously accepted (hint, hint).
Nerd fact: These pages are generated using org-mode in Emacs, a modified ReadTheOrg template, and a bunch of scripts.
Ended up here randomly? These are the pages for a one-semester course at 67% speed on imperative and object-oriented programming at the department of Information Technology at Uppsala University, ran by Tobias Wrigstad.